
Twitch clips are a great way to share your communities best moments with the world. It can be a great marketing and growth tool if you know how to use it too.
Clips can capture the highs and lows of a stream. Offering a tiny glimpse into jokes and situations which you want to share with new viewers. Like highlights they never expire. So you can continue to access them, building up a summary of your channels best moment over time.
In this guide you’ll learn how to clip on Twitch, what to clip, and how to share them to grow your channel.
Creating Clips
You can create clips from your live broadcasts and VODs. It’s easy and anyone can do it. It’s also important to note that anyone can create VODs even viewers that don’t follow a channel.
All you need to do is hover your mouse over the stream’s video to bring up the overlay. Click the “clapper board” icon in the bottom right.
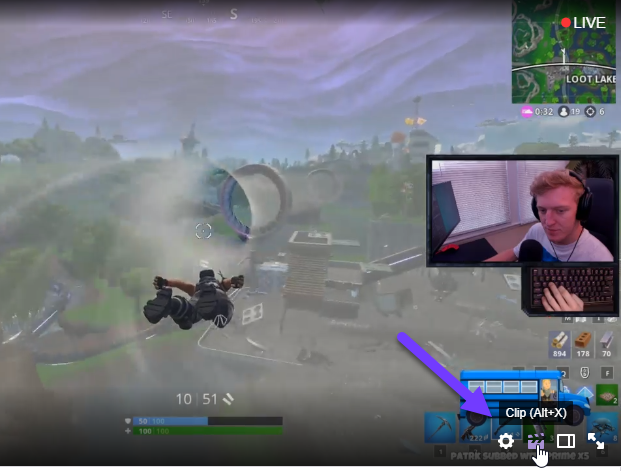
Clicking this will create the clip and open the clip editor in a new tab.
It will display an editor that shows about 90 seconds of video leading up to where you clicked the clip button.
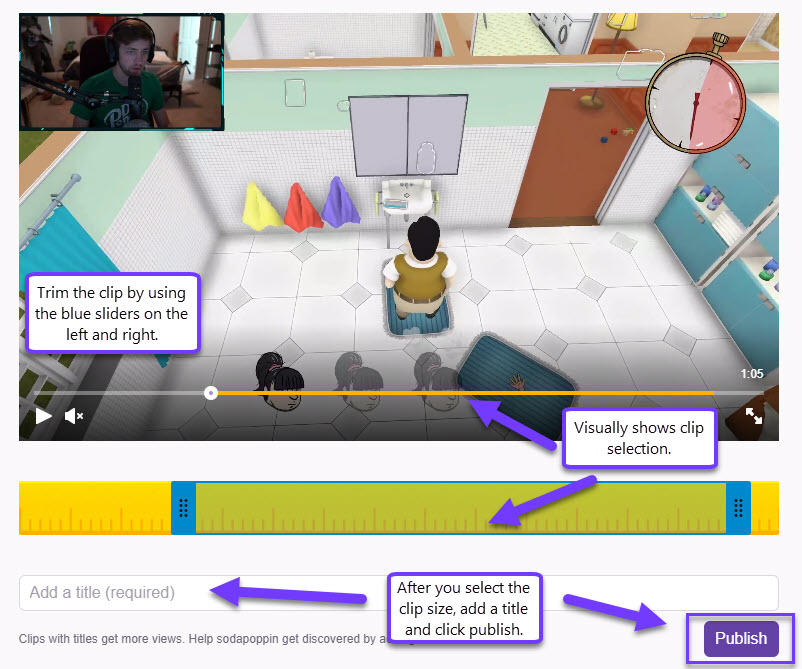
If you didn’t quite hit the right timing don’t worry. The clips trimming feature allows you to edit and adjust the timing. You can trim a clip down to as little as 10 seconds or extended for up to 60 seconds. Letting you get the perfect slice of content.
Once you’ve finished enter a title and hit publish. This will save changes and give you a share link. Note that the streamer can see a notification that you made a clip.
If you want to delete a clip, click the gear icon on any clip viewing page and select the option to remove the clip.
A clip displays the username of the streamer, the clipper, the game that’s being played, and the title of the stream at the time of clipping.
Creating Clips on Mobile
To create a clip on iOS tap on the screen during the stream. You can then hit the share icon and select create clip. For Android users tap on the screen then hit the create clip button on the video player.
Managing And Sharing Clips
Every channel has a clips tab, where you can see every saved clip.
Viewers can then use filters and sorting to locate the ones they want. If you’re looking for clips that YOU made you can use this handy link.
For broadcasters that want to manage clips created from their channel you can do this in the clips tab. Navigate to the video manager and click on the clips tab. From there click on “Clips Manager”.
Here you can see clips you’ve created as well as clips taken from your broadcasts. This will allow you to view all clips. You can moderate clips by using timeout, ban and delete functions if needed.
To share a clip select the desired clip and then hit the share button. This will allow you to post to any connected social platforms including Facebook, Twitter and Reddit. You can also copy the clip to a clipboard which will allow you to share it in chat or embed it into your feed.
A more advanced method would be to download the clip. This allows for better editing and rendering the video in a format that is more fit for other platforms. Right-click on the video and select “Save As”. This will download the video as an mp4 that you can use in your editing software.
When sharing clips its a good idea to think about your audience.
Sharing game clips into a community for that game can be a great way to generate interest for your stream. You can also share them to your social channels so viewers who missed your stream can stay up to date. It’s also a good way to introduce new potential viewers to your stream.
What Content Should You Clip
Clipping is a great way to share your communities highlights. But if used too often it could lead to over saturation. You want to ensure that clips are relevant, funny and engaging. Here are some things to think about before you clip:
- Is the moment funny?
- Is it relatable?
- Does it make you smile?
- Does it sum up your community?
- Does it capture an important moment or event?
- Is it embarrassing or cringe-worthy?
If you answered yes to one or more of these, then make that clip. Clips should showcase the absolute best of your channel. Moments which are funny, heart-warming, relatable or “share worthy” will gain more traction with new audiences.
A Word of Caution
Embarrassing moments can also be good to clip. But remember that streamers are people too. Some might not react well to having their mishaps highlighted. Some cringe-worthy assumptions, mis-pronunciations or embarrassing gaming moments can make great clips but they only work if the broadcaster is on board. If they’d rather forget their failure then you may find yourself with a timeout or ban for clipping and sharing with the world.
Naming Clips For Optimal Sharing
When naming clips think about who you are trying to reach and why. A clip name can help generate views but it needs to be named appropriately. Trying to find a name which sums up the clip but also sounds exciting or intriguing can be difficult.
Think about the audience, the clip and the result. Naming a clip something like “Broadcaster meets a hilarious demise” is more enticing than “Broadcaster fails”. Details are great, just don’t go overboard. Here are a couple of naming tips.
- Keep names short but descriptive
- Remember that the broadcaster and game names are in the clip description so you don’t need to include them again.
- Avoid excessive punctuation
- Clickbait or dramatic titles can evoke varying reactions, so use them carefully.
It may also be worth thinking about search engines if you are trying to use the clips to get new viewers. Try to use titles that would match something that someone would search when trying to find the clip. A huge mistake streamers make is using creative titles, and no one can find the clip again. Be descriptive of the content that’s inside the video so if people want to find it again, they can.
Conclusion
In summary clipping is a quick and easy way to share your communities best moments. Make sure clips are short, engaging and interesting. Giving them brief but descriptive and enticing titles can help them spread further.
Remember that unlike your streams content, clips are “static”. This means that they will stick around until deleted. This gives you the ability to archive content and use it as a marketing piece to grow your channel. Or at least it will act as a small overview of your channel.

